Tuesday, January 29, 2013

Asian Noodle Soup

This recipe by Robin Robertson was recently highlighted on the VegNews site.

I love Asian-inspired cuisine, and was intrigued by the kick of hot sauce in here, which I knew my boyfriend would like!

This soup has a wonderful group of flavors that work well together. It's a really delicious, hearty soup!
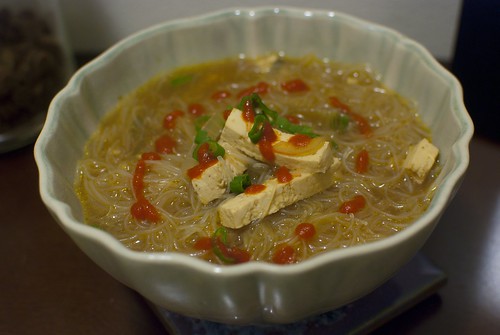
food_20130114_10

Asian Noodle Soup

What You'll Need
8 ounces rice noodles
1 tbsp vegetable oil
1 yellow onion, thinly sliced
2 garlic cloves, minced
2 tsp grated fresh ginger
2 tbsp hoisin sauce*
2 tbsp soy sauce
5 cups vegetable broth or water*
3/4 cup seitan or extra-firm tofu, cut into 2 x 1/4-inch strips
2 tbsp rice vinegar
2 tsp Asian hot sauce*
3 scallions, minced
1 cup fresh bean sprouts*
1 cup chopped fresh cilantro*

*see my tips and tricks, below, for additional suggestions

What You'll Need to Do
Boil a pot of water and cook the noodles until they reach desired tenderness. Drain them and rinse under cold water, then put aside.

In a large pot over medium-high heat, heat the oil. Add the onion and cover, cooking about 5 minutes, until soft. Stir in the garlic and ginger and cook an additional 30 seconds. Add the hoisin sauce and soy sauce, then stir in the broth and bring to a boil. Reduce the heat to low and let it simmer for 15 minutes.

Stir in the tofu or seitan, noodles, rice vinegar and hot sauce, and let simmer another 5 minutes (to heat it through and allow the flavors to meld). Once poured into it serving bowl, top with scallions, bean sprouts and cilantro. Serve hot, of course!

Tips and Tricks
Hoisin
Hoisin sauce is a commonly-used Asian sauce. It might seem like a bit of a splurge, but it's not too expensive, especially at an Asian market. It's also a great investment--it makes an excellent dipping sauce and is also a great addition to stir-fry!

Vegetable broth
This recipe calls for vegetable broth or water. Many soup recipes offer this option, but why add plain old water when vegetable broth will provide so much more flavor? You can always make your own broth (definitely the best way to go in terms of more flavor and less preservatives), or check out some of the vegan options available at the grocery store (I like Imagine and Pacific brands the best). Another alternative, if you want to cut back on your sodium intake a bit (or save space in your kitchen!), is to buy vegan bouillon cubes (I like the Rapunzel brand).

Hot sauce
Yay for Asian hot sauce! We love Sriracha. My boyfriend is a big fan of spicy foods, and with this recipe we could easily spice our soups according to personal preference. We both ended up adding more than the 2 tsp the recipe calls for, but I'd say that's a good starting point. It has a little kick but is not overwhelming.

Garnishes
I skipped the bean sprouts and the cilantro. I'm not a big fan of too many garnishes, and I found the chives added just the right amount of texture.

Noodles
This recipe calls for a high noodle to broth ratio. Next time around I'll definitely add more broth, I might even consider doubling it (and doubling the seasoning accordingly).

Thursday, January 24, 2013

Simply Scrumptious Chocolate-Covered Strawberries


Untitled


The other night I had my friend Anne over for dinner. My boyfriend and I were about to go out of town, so I made us all a bit of a mini-feast, and ended up cooking pretty much all of the perishable items we had on hand. We had an entire package of strawberries, and I had somehow accumulated several opened packages of vegan chocolate chips over the last several weeks, so I decided to make chocolate covered strawberries!

This is a great recipe to keep in mind for Valentine's Day...or any other time of year when you want to make something "fancy" that in reality is affordable and quite easy!

Simply Scrumptious Chocolate-Covered Strawberries
What You'll Need:
1 pound strawberries (washed and thoroughly dried)
1 cup vegan semisweet chocolate chips (about 6 oz.)
wax paper or parchment paper

What You'll Need to Do:
Put the chocolate chips in a microwave-safe bowl, and microwave on high for 1 minute. After 1 minute, remove from the microwave and stir thoroughly with a fork, really pressing down on the softened chips as much as you can. Return to the microwave for another 30 seconds and stir thoroughly again. At this point, the chocolate should be completely melted.

Take individual strawberries by the stem, and dip them into the chocolate. Twirl them slightly as you remove them, coating all sides thoroughly, and allowing the excess chocolate to drip back into the bowl. Place them on the parchment (or wax) paper to cool.

To speed the cooling process (and to store them until you're ready to eat!), place your paper (parchment or wax) on a cookie sheet or large, flat plate, and put the strawberries in the refrigerator once finished. If you're working in a warm environment this will be especially important!

Untitled My Tips and Tricks:
The biggest danger of using the microwave to melt your chocolate is the ease with which it can burn. I used to do this time after time when I first started using the microwave method. I've found that one minute in the microwave followed by another 30 seconds is ideal. If, however, your chocolate is still not melted after a minute and a half, you can zap it in 10 second increments, stirring thoroughly after each go round. If you heat the chocolate too much it will appear hard and crumbly, and you'll know you've burnt it. There's really no returning from this, you'll have to start over. So take it slow, and stir, stir, stir!  If you've ever used a double boiler (or made your own) and you're comfortable with that, feel free to do so, of course. I just find that the microwave is really quite straightforward and simple!

Untitled

I made these strawberries in all of about 10 minutes, but there are lots of ways to add a bit of pizazz to your berries! If you melt white chocolate, you can drizzle this on top with a fork, for a really beautiful result. You can also cover strawberries in finely chopped nuts, coconut, or even cookie crumbles after dipping in the chocolate--the sky's the limit, really!
20130212_0549
20130212_0551
Untitled

Friday, January 18, 2013

M.O.B. Cafe

MOB Cafe

My boyfriend and I attended a concert at Roulette in Brooklyn the other night. After the show we were famished, and were pretty much ready to eat at the nearest restaurant we could find. Luckily for us, half a block away we came upon M.O.B. (Maimonide of Brooklyn) Restaurant. The specials sounded great, and a closer glance at the menu revealed that it might even be vegan! Thrilled with our discovery (it also looked great inside), we sat down and checked things out a bit.

MOB Cafe
MOB Cafe
It was a bit funky, a bit edgy, and I loved the lighting...

Anyway, on to the food!

And drink...
MOB Cafe
I had a lavender champagne (a nice glass of prosecco with a lavender-infused sugar cube in the bottom). It was fun--the sugar bubbled up quite fervently to the top of the glass--and I really liked the taste, too!

I actually ordered an appetizer, as I'd had a bite to eat before the concert, but what I did get was delicious.
MOB Cafe
I ordered the twice-baked potato. It came with smoked tofu and scallion cashew sour cream, as well as black radishes. (The potato toppled over before I took this photo, hence the slight mess on my plate)
The tofu was some of the best I've ever had, and the cashew cream was phenomenal.

My boyfriend had the macaroni and cheese, also made with cashew cream (and artichoke hearts!). We both walked away quite content, talking with anticipation about our next visit.

Some more thoughts...
I did a little research before writing this post and it sounds like we may have gone about things a little backwards, having wandered in unawares. Apparently there's a great bar in back, and an outdoor patio. We also missed out on their signature dish (whose shape is inspired by the Brooklyn Bridge), but we thoroughly enjoyed our meal and our time there, nonetheless.

The place also has an interesting backstory, and apparently shares a sister restaurant in Paris. I'll let you read about the philosophy here, but it suffices to say it's amazing food you can feel good about eating.

Thursday, January 17, 2013

Doughnut Heaven

I love, love, love doughnuts. And when I discovered a great online vegan donut recipe a few years ago, I was just thrilled. But  this entry isn't about baking recipes (although I'd like to post some of those later). It's about a great little cafe that's popped up in Brooklyn, called Dun-Well Doughnuts.
Untitled

When I read about this online I couldn't believe it! It sounded like a dream come true. They boast over 200 flavors of doughnuts (such as peanut butter and jelly, french toast, Boston cream, root beer, smores, blood orange, and strawberry kiwi). And they were voted Best Doughnut in New York in 2012!

Aside from the doughnuts, the coffee's really good (according to my boyfriend, and other online reviews). And for the non-coffee drinkers out there, they also have Italian soda, and egg creams! I got a chocolate one (below). SO good.

Did I mention everything they sell is vegan?

Untitled

They had donut kabobs on Sunday, although by the time I got my camera out I'd already eaten one and a half of them.

Aside from some of the more outrageous flavors, they've also got your standard, classic favorites. The chocolate doughnut (above) was mouthwateringly delicious.

Untitled
Pictured above is the margarita doughnut (left) and the vanilla with sprinkles(right)--both very tasty! All of the doughnuts were raised (not cake). They had that nice, soft dough that just melts in your mouth. Mmmm....

Untitled
I took this photo (above) when several parties had just cleared out--otherwise the place was packed the whole time we were there! The ambience was quite nice, too. Lots of little vintage touches, all very tastefully done. They serve the doughnuts on lacquered wood slabs.

Untitled

Some advice
They only have select flavors on a given day, and they bake them fresh twice daily. We got there around noon on a Sunday, and aside from a jelly doughnut, the flavors we tried (described and pictured above) were all that they had available. I heard they were almost done with a new batch, but it's a shame we missed out on some more variety. I guess I might have to go back!

I thought the doughnuts were a-maz-ing...I haven't stopped thinking about them. My boyfriend thought they were really good--but I'm not sure he would make a regular trip from Manhattan for them. If you're a real doughnut aficionado, though, it's absolutely worth the trek!

Saturday, January 12, 2013

Fried Green Tomatoes

20121125_0035
This is yet another entry featuring a vegetable (or fruit, technically) from my CSA!

When confronted with these little green tomatoes, I was at a bit of a loss. My boyfriend (of course) instantly suggested "fried green tomatoes!" The suggestion definitely sounded like a good one. While living in Raleigh I'd had delicious fried green tomatoes several times, but had never tried making them myself!

I thought I remembered that one of my favorite vegan blogs, VeganYumYum had posted a recipe about this quite a while back...so I decided to tackle it!

This recipe is an adaptation of the one on VeganYumYum (my version is pictured below, with a side of black radish chips).

20121125_0040

What You'll Need:
8 small (or 4 large) green tomatoes
peanut oil (or canola), for frying

Breading Mix
1 cup corn meal
1/4 cup all-purpose flour
1/2 tsp basil
1/4 tsp oregano
1 tsp garlic salt
1 1/2 tsp salt
cracked black pepper, to taste (approximately 1/8 tsp)

Batter Mix
2 tbsp Bob's Red Mill vegetarian egg replacer*
6 tbsp boiling water
1/2 cup almond milk (or soy)

What You'll Need to Do:
Core the green tomatoes and slice them into 1/2" slices. Pat dry with a paper towel.

Mix together the breading mix and set aside in a plate or shallow bowl.

Combine the boiling water and egg replacer in a small bowl or cup and whisk until thick and foamy. Add this mixture to a separate larger bowl, along with the milk, and continue whisking. You'll now have two separate bowls, one with your dry mix, and one with the wet.

Heat a heavy-bottomed skillet until hot (but not smoking!), with about 1/4" of oil in the bottom.

Place a tomato slice in the wet batter mix, and make sure its fully covered. Then place the slice in the bowl with the dry breading mix. Flip and press, several times if needed, to be sure the dry mixture is completely coating the slices.

Repeat these batter/breading steps with as many slices as you can fit in the pan at a time (I fried about four or five at a time), being sure not to overcrowd it (overcrowding will lower the heat, making for soggy fried tomatoes!). Fry on each side for about 4 minutes, until golden.

After frying, place on paper towels to help drain the oil.


My Tips & Tricks:
When shopping for green tomatoes, the general rule is, the larger the better (you want them to be about the same size as a regular tomato). In my case, however, I had the last pick at the CSA pickup, so we had mostly tiny tomatoes. I have to say, once they were fried I didn't mind--they sure were tasty!

I also made the balsamic reduction recommended on VeganYumYum.

roasted root vegetables and green salad

Aside from frying, you've got lots of other options with green tomatoes. They're nice and crunchy on their own, and they go pretty well in salads, relishes, etc. I threw them in with a little arugula, toasted walnuts, and dried cranberries (above, left). Tossed with a vinaigrette they were really good!

*egg replacer is an ingredient you'll commonly see in vegan baked goods. I think it tends to make things a little dry and chalky, so I try to avoid using it when possible, especially for moist baked goods. It does, however, provide good binding properties and sometimes (as in this recipe) taste is not an issue! Bob's Red Mill egg replacer is one of the more expensive brands on the market, but I prefer it over the less expensive, Ener-G egg replacer. With the amount of egg replacer I use (i.e. rarely an entire bag in a year) the improved taste is definitely worth the difference in cost.

Friday, January 11, 2013

Easy Roasted Sunchokes

This is another recipe I made using some of our CSA vegetables: sunchokes!
sunchokes

20121201_0027
I had never had a sunchoke before, and I have to say I was a bit skeptical. Sunchokes, also known as Jerusalem artichokes, are actually a part of the sunflower family! This knobby little tuber almost looks like a ginger root, but they taste like a cross between a delicious, buttery artichoke and a potato. In short, if you haven't tried them, I'd highly recommend them! If you're looking to buy them locally, they're apparently native to the Eastern United States (which may explain why I hadn't encountered them in California). The color on the skin can vary from brown to red, or even purple. Ours were red, which I've read have a more buttery, nutty flavor than those with light brown skins.

20121201_0036


What You'll Need
8-10 small sunchokes
3 cloves of garlic, peeled and cut in half
1 tablespoon olive oil (plus more, as needed)
1/4 teaspoon salt
Leaves from 2 sprigs fresh thyme

What You'll Need to Do
Preheat the oven to 425°F.

Before slicing, you'll need to scrub the sunchokes under cold running water, since you'll be leaving the skin on. Slice the sunchokes about 1/4-inch thick. The exact thickness isn't important, but you want them to be as uniform as possible so that they'll cook evenly.

Add the sunchokes and garlic to a small bowl and toss with olive oil (add slightly more than 1 tbsp if needed, until pieces are lightly coated). Sprinkle in the salt and herbs, and toss to coat the sunchokes. Then transfer to a baking sheet or roasting pan. Bake for 20 to 25 minutes, until the sunchokes are tender inside, like a potato.

20121201_0031
Other tips and tricks:

For easy clean up, I like to line my pan with parchment paper.
You can also use dried herbs instead of fresh. When preparing these for the second time around, I used 1/4 teaspoon dried thyme and 1/2 teaspoon dried rosemary. I also mixed things up: using about half red sunchokes and half "brown." I thought they were equally delicious!

Monday, January 7, 2013

Dehydrated Sweet Potato Dog Treats

My dog (like many!) loves sweet potatoes. These easy to make treats are not only inexpensive, vegan, and free of any additives, they'll also help keep your dog's teeth and gums healthy.
DSC_1681.JPG
My dog Max is pretty awesome. I'm guessing most people feel that way about their pet, but Max is truly deserving of the title (just look at that face!). And while it might seem a bit trivial to some, when I realized I didn't want to buy foods containing animal products, I decided I might want to reevaluate my pet's diet as well.

I was a bit skeptical at first, and also concerned. Afterall, I know how I'm feeling after a meal, and I can adjust my diet accordingly. What if I switched Max to a vegan diet and it didn't work for him? How would I know? So I switched him over slowly, first to a vegetarian dog food that I was pretty happy with, and eventually to a vegan one. Throughout the process I didn't notice any change in his energy levels whatsoever. In fact, he seemed healthier than ever!

So we've stuck with a vegan dog diet and, so far, no complaints. We've moved across the country several times since then, and all the veterinarians I've spoken to agree that as long as he is on a high-quality dog food, the source of his protein is irrelevant. He even loves black beans, edamame, tofu, peanut butter and tomatoes (all in moderation, of course). His real love though is sweet potatoes.
food_20130114_25
Max actually gets pureed sweet potato every morning to help him take his arthritis medication. I also wanted to provide him with a chew that could replace rawhide, to help keep his gums and teeth healthy! Despite loving some foods, Max is a picky eater, but I knew that some sweet potato chews would definitely do the trick. They're even available at regular pet stores, but the prices can be astronomical!

So I picked up a few sweet potatoes and gave it a shot. Here's the recipe I came up with.
sweetpotato_20130114_01 - Version 2

Dehydrated Sweet Potato Dog Treats
What You'll Need
2-3 sweet potatoes (depending on how many treats you want to make)
parchment paper
1 cookie sheet

What You'll Need to Do
Preheat your oven to its lowest setting (around 175-200°F).

Line a cookie sheet with parchment paper.

Slice the potatoes along their width with a sharp knife so that you have long, slender pieces, 1/4" in thickness. The width and length you choose will depend on how large you want the treats to be (remember they will shrink significantly during baking).

Place sweet potatoes on the cookie sheet and set them in the oven. You can really crowd them on there, as they will shrink during baking.

Bake for 2-5 hours, checking every hour or so. For harder, crunchy treats, bake longer. For chewier treats, decrease baking time. Don't be afraid to give them a nibble as they're baking to test the consistency!

My Tips and Tricks:
I'm kind of obsessed with parchment paper. If you've never used it before, it's an awesome way to make baked goods, etc. without needing to grease or oil a pan or sheet, and without worrying about sticking. Unlike aluminum foil, it won't heat up, so it really allows your food to cook in the same way as it would if it were placed directly on the pan or sheet. If you cook as much as I do, you use a ton of parchment paper, and I have to admit I feel a little guilty about that. To be as environmentally friendly as possible, I like to use the "FSC Certified Unbleached Parchment Baking Paper" (just follow the link for more on this).

Slicing potatoes like this requires a very sharp knife and some pretty good chopping skills to get everything even. If you've got a mandoline, this is the time to use it. Without one it's certainly a bit of a challenge, but I managed!

In terms of the treats, you want to set your oven really, really low. If you have a dehydrator, problem solved. For the rest of us, you'll have to rely on your oven's lowest setting. While mine was 200°F, my oven often crept up to around 250°F. My first round of treats was in the oven for about 5 hours, and they were super crunchy. My next round was only in the oven for about 2 and a half hours, and they were much chewier, but still with a slight crunch. 

Here's Round 1:

food_20130114_27
Before baking (above), and after (below)
food_20130114_30
And Here's Round 2:
food_20130114_31
food_20130114_42


The difference? Kind of a lot. In the first round I cut my slices pretty thick, but also pretty small. On average they were probably a little bit thicker than a 1/4". After baking for about five hours, they were very crispy. All those dark brown regions are very, very crunchy. This is a little bit difficult for Max's small mouth to chew, and wasn't quite what I was going for, so I decided to try again.

The second time, I cut much larger, slightly thinner pieces (1/4" in thickness each), which were about 1.5" x 4" each. I baked them for only about 3 hours, and I was much happier with these results.  Ideally though, you'll probably want to cook yours slightly longer at a lower temperature (I had trouble getting mine to stay at 200° for some reason).

Also, if your dog loves sweet potato as much as Max (and even he doesn't), keep an eye on him while he eats! Max liked to think he could swallow a huge chip all in one go. Needless to say, he couldn't even get close, but it's probably a good idea to make sure your dog doesn't take on more than he can safely chew. 

And finally, keep in mind, sweet potato (like pumpkin) helps regulate your dog's digestive tract (if you catch my drift). So while you may love giving your dog the treats he loves, just be sure it's all in moderation, particularly if your dog is on the smaller side.