Tuesday, May 24, 2016

Fresh Spring Pasta with Ramps, Peas & Asparagus

rampspringpasta


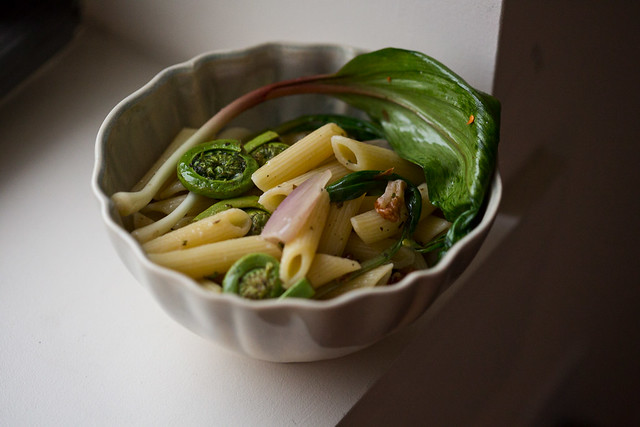
I've been waxing poetic about spring lately. (love those ramps!) This recipe has lots of great spring veggies, and is based on a salad recipe I found while trying to come up with some more creative ways to use my ramps. I added some pasta because I'm a sucker for a good pasta dish, but see tips and tricks below for more ideas. You've heard enough about spring veggies from me the last few weeks, so let's get right to the recipe!


Spring Pasta with Ramps, Peas & Asparagus dressed with lemon vinaigrette
What You'll Need:

1 16 oz. package pasta (such as fettuccine)
Vinaigrette: 
3 tbsp extra-virgin olive oil
Juice from 1 lemon (~2 tbsp)
2 tsp grated lemon zest
1 tbsp minced shallot (approx. 1 small)
2 tbsp vinegar (white balsamic, apple cider, or just plain white)
Salt and pepper to taste

Veggies:
10 oz. defrosted frozen peas
2 cups fresh snap peas, ends trimmed, cut in half
1 pound asparagus, stalks trimmed, tips removed and separated
2-3 tbsp olive oil

~12 whole ramps, cleaned, ends trimmed

Combine dressing ingredients in small bowl. Whisk together and set aside.

Bring a large pot of lightly salted water to boil. While water is heating up, prepare an ice bath. Boil defrosted peas in the water until bright green (about a minute). Transfer to ice bath with a strainer, then add your snap peas to your boiling water and cook for about 2 minutes until also bright green and slightly tender, then transfer these to your ice bath with the strainer. Finally, add your asparagus tips (not the stalks) to the water, and boil until just tender (another minute or so), before also transferring to your ice bath with the strainer. Now remove all the veggies from the ice water and transfer them to some towels to dry.

Boil a separate pot of water to prepare your pasta according to package directions. Once the pasta is al dente, drain, and mix in the "dressing" ingredients. When your vegetables are relatively dry you can mix them in.

Now for your asparagus puree. Transfer the stalks to the blanching water and boil them until they're very tender, just a couple of minutes. Transfer to a blender and add 2 tbsp of olive oil. Blend until smooth, adding a bit of blanching water if needed. Season with salt and pepper to taste then set aside to cool a bit.

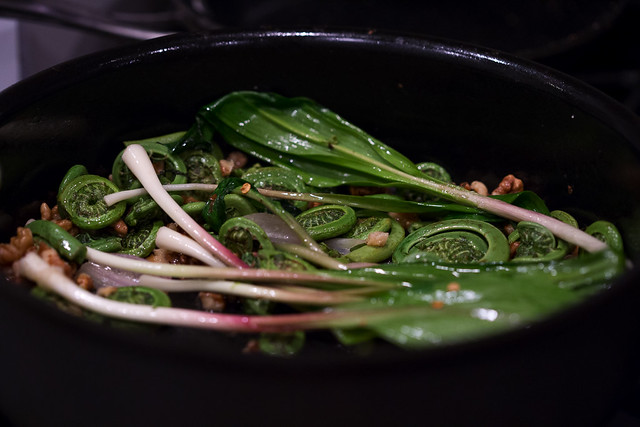
Finally, prepare your ramps. Heat some oil in a large skillet over medium-high heat. Add your ramps once hot and sauté until lightly browned in some areas and the leafy green part is beginning to soften. Season with salt and pepper to taste.

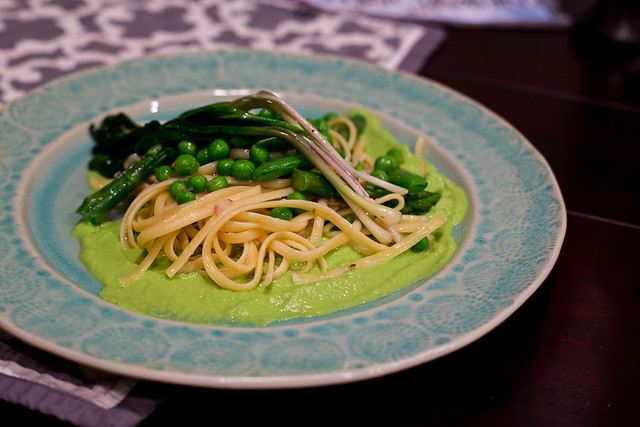
Spoon asparagus puree onto bowls or plates. Place pasta with veggies on top, and finally top with ramps!

Tips & Tricks:
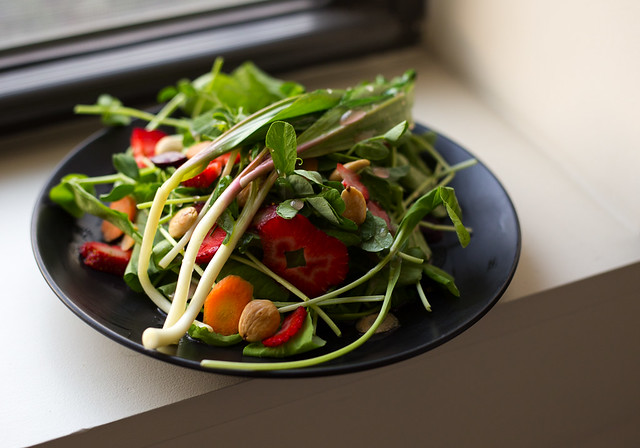
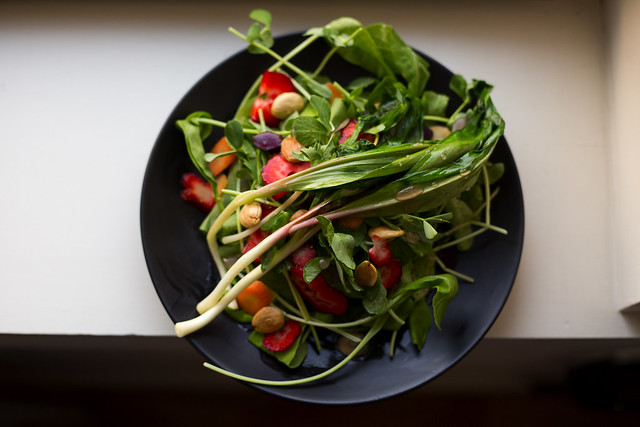
Looking to cut down on the carbs? Want to make this gluten-free sans the gluten-free pasta? The original recipe I based this on was a salad, which is equally delicious. Substitute some micro greens or arugula for the pasta, and you're good to go!

Sunday, May 22, 2016

Sautéed Fiddlehead Fern Pasta

fiddleheadferns12


Spring! It's such a wonderful time to take advantage of fresh produce. And as I said in my post a few weeks back, I have been doing just that.

This recipe features some wonderful local produce from Farmigo, but you should be able to find these ingredients in the early spring at a farmer's market or anywhere else selling local produce on the East Coast (the west has its own western fiddlehead fern, known as a lady fern).

fiddleheadferns13

Despite being quite intrigued, I'd never tried fiddlehead ferns before making this recipe. Frankly, they certainly look a bit strange and I wasn't quite sure how I would feel about them! Turns out they're delicious...essentially the texture of a delicate asparagus but with a richer flavor (almost nutty) that needs to be tasted to be fully appreciated.

fiddleheadferns4

Since I had never cooked with fiddlehead ferns before, I did some reading.  I checked out a few sites. GRACE Communications Foundation had a very thorough description of the history of their use, cultivation, characteristics, and how to prepare them.

There are mixed opinions on the health effects of eating ferns (see link above for more info), so it is best to eat them in moderation. It is also recommended to boil or steam them for 10 minutes before preparing. I was worried this might effect the flavor, but it did not! They were excellent. The site I used gave excellent instructions for cleaning and boiling, which I've included in the recipe below. said they paired well with ramps, so I incorporated both into my recipe. They compliment each other beautifully.

RampnFern2

You essentially just sautée everything together, add your favorite pasta, a little splash of vinegar and lemon, and you're good to go!

RampnFernpasta

Sautéed Fiddlehead Fern Pasta with Shallots, Ramps and Toasted Walnuts
What You'll Need:
8 oz. fiddlehead ferns, cleaned
1 small shallot, roughly chopped
3 tbsp olive oil (divided)
1/4 tsp red pepper flakes (or more, to taste)
1 bunch ramps, cleaned and trimmed
Salt and pepper to taste
1/2 tsp dried basil (plus a pinch)
1 tbsp white wine (optional)
1/4 c. toasted walnuts

1 16 oz. package pasta
1 tbsp white wine vinegar*
Juice of 1/2 lemon

What You'll Need to Do:
Clean your ferns. Fill a bowl with cold water, then gently add your fiddlehead ferns and swish them around. This should remove all of the brown, paper bits that can cling to them (which are just a part of the fern), and any dirt that may be hidden inside those tiny coils.

Prepare a bowl of ice water. Bring two pots of lightly salted water to boil. Boil pasta until just al dente in one pot, then drain, reserving 1/4 cup of the pasta water and returning to the pot. Boil fiddlehead ferns for 10 minutes in another. Transfer the fiddlehead ferns to the ice water after 10 minutes, to stop the cooking. Then drain well and pat thoroughly dry.

Heat 1 tbsp olive oil in a large sauté pan over medium-high heat, adding shallots once warm. After a minute or so, when the shallots are fragrant and just beginning to soften, add in the fiddlehead ferns. Sautée for a minute and then add in your ramps, along with red pepper flakes and/or black pepper and a pinch of dried basil. Throw in a splash (about 1 tbsp) of white wine to steam your ramps. Add your walnuts, toss and remove from heat.

Stir in 1 tbsp white vinegar, 2 tbsp olive oil, 1/2 tsp dried basil, and a pinch of salt and pepper to your pasta. Taste and adjust seasonings as desired. Add pasta to your sauté pan and return to medium heat, tossing the pasta with the vegetables to allow the flavors to really soak in for a minute or two. Turn off the heat, and add lemon juice (1-2 tbsp), to taste.

Enjoy!

Tips and Tricks
So many parts of this recipe are interchangeable. No ramps? Try some spring onions, or just another shallot. No ferns? No problem there either. Ramps will pair great with this pasta, as will spring onions. The combinations are endless!

*similarly, don't feel too tied to white wine vinegar, red wine, balsamic, or even apple cider will do in a pinch!

Monday, May 9, 2016

Farmigo

farmigosalad


Hello all!

Spring is here and there is a plethora of local fresh produce to be had.

It makes me very, very happy.

There's nothing better than throwing open the refrigerator and being overwhelmed with options for a flavor-filled, veggie-filled meal. I made the salad above with local organic arugula, pea shoot micro-greens, sautéed wild ramps, rainbow carrots and perfectly juicy strawberries. Topped with some rosemary-fried marcona almonds and some raspberry vinaigrette--delicious!!

Before I dive into more great recipes I've had the pleasure of eating this spring--and if you're wondering where I got all of the delicious looking veggies for this salad--I want to tell you a bit about my new favorite source for delicious local produce.

farmigosalad

They're called Farmigo, and they're kind of like a cross between a CSA and a Farmer's Market. Basically, they have an online market where you can browse and purchase fresh, local produce, and a variety of other prepared foods, online. Their goal is to provide what they call "farm-to-neighborhood" access to food, to benefit farmers and consumers, without the supermarket middleman. They source their food from farmers and food makers that they believe have the best quality products and are located within 500 miles of their respective communities, though more often than not they source from much closer--as they say "the more local, the better!" They also do their best to source from small farmers, either generational family farms or newer, younger farmers, and they let you know every week what percentage of your purchase price is going back to the farmers (hint: it's a lot--which is a great thing!).

fiddleheadferns9As frequently as once a week, you can order your food to be picked up at a location of your choosing. They have a variety of locations in every city they are based in. In Brooklyn there are tons of pickup locations near our apartment. I, for instance, pick up on Monday evenings at a local ice cream shop near me. Some pickups are at schools, or other institutions, basically anywhere someone has volunteered to host. You can order your food whenever you feel like it, or skip as many weeks as you want, there are no fees or anything like that.

Right now they're based in New York, New Jersey, Northern California and Seattle, and they're in the process of expanding. And no, they did not ask me to write this review.  I've just been so thrilled with the quality of the food they offer that I want to spread the word!

The thing I like the most of all is that you can read up about each of their vendors and their practices. This means you can select vendors who treat animals ethically, for instance, or who only use organic farming practices. I love how transparent they are. It allows you to make informed decisions when deciding where your food comes from, which is fantastic.

What types of food options do they have for vegans, you ask? A whole bunch! They have a whole vegan category you can browse, which includes not just great produce, but cashew creams, breads, hummus, sauces, mousses, puddings, chips, chocolate, and some of my favorite veggie burgers in the world, as well as some other great fresh-frozen items. In the winter they had a delicious black bean and squash chili that was hearty and deeply flavorful. They've also got granolas and baked goods, and a true plethora of gluten-free options.

Some of the vegan products are a bit pricey, but I like to treat myself to a vegan splurge every now and again.

coconutyogurt

They have delicious coconut yogurt made by Anita's. It's creamy and rich, and a 16 oz tub will go a long way. Its made from nothing but coconut milk, coconut water and live cultures, but its hands-down the best vegan yogurt I've ever had.

The mango yogurt (below) is the best yogurt I've ever had. Period.

coconutmangoyogurt

We've also recently discovered Brooklyn Whatever Shpickles--the carrots are delicious! (hence the fact that this jar was nearly empty when I took this picture) They also have pickled brussels sprouts and broccoli! This jar will set you back just about $8, but one jar goes a long way!

shpickles

They also have the most amazing sprouted organic almond milk. This is probably the priciest for what it is, and I'm not one to normally even just "drink" almond milk all on its own (unless it's with a cupcake or a cookie!)--but let me tell you, I savor every sip of this stuff!

chocolatealmondmilk

Anywho...that's all for now...coming up I'll share some of my favorite recent spring recipes, featuring some delicious local produce.

Thursday, May 5, 2016

Cauliflower Piccata

Cauliflowerpiccata_01

I've been markedly absent from the blog-o-sphere lately, with a myriad of things going on in my personal and professional life. But I've been getting back in the kitchen lately and photographing away! So bare with me while I attempt to catch up on my backlog.

Let's start first with something that became a real instant favorite of mine over the winter. Cauliflower piccata! While this may not exactly be a spring recipe, it's perfect for these last few cool weeks as we get ready to make the full transition into summer.

I've long been a fan of seitan piccata, and before that I was eating lots of broccoli piccata, following the recipe from Vegan Lunchbox (a vegan cookbook staple in my household in 2008).

This cauliflower recipe is undeniably inspired by that, as well as a recent recipe I found in the New York Times for whole roasted cauliflower. Simply combine the two, et voilà! Instant classic. My husband absolutely loves this dish, as do I. It's also been whole-heartedly embraced by my non-veg friends and family.

The Times recipe calls for an almond-herb recipe. Sounds delicious. Also sounds like a lot of work. The piccata sauce, on the other hand, literally takes just a few minutes to whisk up. The long part of this recipe is just letting the cauliflower sit in the oven, so keep that in mind when preparing.

Cauliflowerpiccata_02

Roasted Cauliflower Piccata
What You'll Need:
1 large cauliflower
4 tbsp olive oil
2 tbsp freshly squeezed lemon juice
4 tbsp capers
2 tsp flour*
4 tbsp vegetable Broth (water will do, in a pinch)
1 large or 2 small garlic cloves, minced

What You'll Need to Do:
Place a small pan of hot water on the bottom rack of your oven, to create steam (save the top for the cauliflower). Preheat your oven to 375°F.

Rinse that cauliflower. Cut off the base of the cauliflower and the leaves. Then cut out the hard core of the cauliflower, taking your knife at an angle, and cutting into the thick stalk of the cauliflower, in a circle, being sure to leave the main stem and all of the florets intact. Once you've gone all the way around, the stalk and the leaves should come away from the rest of the cauliflower easily. Don't cut too deep, you want the cauliflower to stay together!

Once you have the cauliflower trimmed, place it on the cutting board (core side down) and drizzle with 1 tbsp olive oil. Rub the oil in with your hands so that it gets well distributed on the surface and then sprinkle with salt.

Once the oven is heated, place the cauliflower in a heavy baking dish or oven-proof pan (again, core side down) and let it cook for an hour and a half to two hours, until it's nicely golden or browned to your liking. Sprinkle another tablespoon of olive oil on about half way through.

When you're about ready to take the cauliflower out, make your sauce.

To make sauce, whisk together vegetable broth and flour in a small bowl or measuring cup. Heat 2 tbsp olive oil in a small saucepan over medium-high heat. Once hot, add the garlic and cook, stirring constantly until just fragrant, about 30 seconds (being careful not to burn). Add lemon juice, capers, and flour mixture. Cook, stirring constantly, until thickened, about 2 minutes. Remove from heat, season with salt and pepper to taste, and pour it on top of that hot cauliflower!

This all reheats well, too--makes great leftovers.

Bon appétit!

Cauliflowerpiccata_00

Tips and Tricks:
Short on time? Boil the cauliflower for about 10 minutes first, then roast. It will cook much more quickly (you'll want to give it at least 15 minutes in the oven after boiling).

*Gluten-free version: substitute gluten-free corn starch instead of flour.