Sunday, February 17, 2013

Roasted Asparagus, Pine Nut, and Farfalle Pasta

Roasted Asparagus and Pine-Nut Farfalle

VegNews recently posted a recipe for a Quick Asparagus Pasta. The relatively short grocery list (and especially the pine nuts!), instantly caught my eye.

I ended up making a few changes to amp up the flavors a bit. I added a few dashes of sage and a little bit of Italian vinegar at the end.

I made one particular change that I thought made quite a difference: instead of steaming the asparagus, I roasted it! Does that take the easy out of things? I don't think so.

Never roasted asparagus? Now you've got an excuse to try!

Easy Roasted Asparagus
What You'll Need:
1 bunch asparagus (about 1 lb)
1 tbsp balsamic vinegar
1/4 tsp ground pepper
(if you're using this as a side dish, I'd add a few tbsp of some freshly chopped herbs, like thyme or rosemary)

Preheat the oven to 450F and line a rimmed baking sheet with parchment paper. Chop your asparagus however you'd like it (mine were in 1/4 inch pieces for the pasta, but you could do wholes spears for a side dish), being sure to trim off the tough end of the asparagus (the bottom 1 1/2 inches or so), and arrange on the sheet. Sprinkle the vinegar over the asparagus along with the spices, and toss to coat. Roast the asparagus for about 10 minutes, rotating the spears about half way through. Cook them until tender (but be careful not to overcook!).


Tuesday, February 12, 2013

Teeny Tasty Party Bites

Looking for some food to serve at your next get together? Or something easy to make as a little snack?

Let's take a look at my Super Bowl line up for some ideas! These are all very basic recipes, basically on homage to game-day food...certainly not the healthiest meal I've ever put together. But if you're looking for some fast, easy, tasty things to throw together for a fun night, you might want to try some of these out!
Super Bowl feast!!

The menu (from lower left, clockwise):
barbecue (apricot) meatballs
(veggie) pups in a blanket
tortilla chips
buffalo-style tofu
chocolate sandwich cookies

In the bowls (from front to back):
jalapeño queso dip
carrot sticks
vegan blue cheese dressing (for the tofu)

To break it down a bit more:
You can get my simple barbecue apricot meatball recipe here.

The pups in a blanket were just adapted from the good ol' Pillsbury crescent roll (yes, they're vegan!) carton, which suggests adding hot dogs and cheese and cooking at 350F (if using a dark, nonstick pan). Cut some veggie dogs in half along their length (so that they're thin), and then cut those slices so that they're about the length of the largest width of the crescent triangles. Place the veggie dogs on the shortest side of each triangle, and some cheddar cheese onto the roll (I recommend Daiya), if desired. Then just roll them up! Bake for 12-15 minutes, until golden brown. Serve warm.

The tortilla chips went great with the jalapeño queso dip, another recipe from VegNews (I used the Daiya cheddar cheese instead of mozarella). It was very good!

And...my favorite part of the evening was my buffalo-style tofu. SO good. You can get the recipe here.

The sandwich cookies speak for themselves, but I should say there is some debate over whether or not Oreos are vegan.* If you want to be safe, you can check out Newman-O's which are most definitely vegan. They're also a bit healthier, although I'll admit the taste is not quite the same as your classic Oreo.

*First of all, I should say that PETA lists these cookies as vegan. While none of the ingredients are animal-derived, it depends on how you feel about sugar processing. Most commercial sugars are filtered with activated carbon, which is often derived from animal bone char. This part of the process is so far removed from the final product that it is deemed kosher parve (meaning that according to Jewish dietary law, it contains no meat or dairy by-products). Many vegans, however, prefer to avoid any sugar that may have been processed with bone char. Vegan table sugars are available at some health food stores.    

Barbecue (apricot) meatballs


Barbecue apricot meatballs


This recipe is simple and straightforward, but these make the perfect little party bites, especially for a game night. If you're looking for something fast and yummy (and not so sophisticated), that is pretty much foolproof, this is the recipe for you!

Easy Barbecue Apricot Meatballs
What You'll Need:
3/4 cup barbecue sauce (I recommend Annie's, or making your own!)
1/2 cup apricot preserves
1/4 cup water
1/4 cup beer (or more water)
About 20 vegan meatballs (if you're not preparing your own, I'd try Nate's Meatless Meatballs)

What You'll Need to Do:
Add barbecue sauce, apricot preserves, water, and beer (if using) to a large pot. Bring the mixture to a boil, then reduce heat to low, and simmer for about 20 minutes. Add the meatballs, stirring until they're well coated. Raise the heat slightly, simmering until heated through (about 5 minutes).

Tips and Tricks:
Nate's meatless meatballs are frozen, so heating them through takes a full five minutes. If you've made your meatballs yourself and they're not frozen, you might need to lessen the time--just pop one in your mouth as you go to make sure they're heated through.

A good barbecue sauce makes all the difference here. You want something that has a bit of a spicy, peppery kick to it, because the sweetness of the apricot will balance that out nicely. I'll try to post one of my favorite barbecue sauce recipes sometime soon. I like to make barbecue sauce myself because it makes a big difference in terms of flavor, is a great way to save some money (particularly if you enjoy the more expensive, organic sauces), and sometimes it can be hard to find vegan barbecue sauce at the grocery store.

If you're looking to make your own meatballs, I recommend trying this recipe, from Kathy Patalsky. It looks great, but I'll admit I haven't tried it yet. I'm generally not a big meatball person, so I've never actually made my own..although it's on my list of things I'd like to try!

Monday, February 11, 2013

Buffalo-style tofu

Buffalo Tofu!

My boyfriend loves spicy food. When asked what he misses the most from his meat-eating days, his two answers are steak and buffalo wings. I can't do much about the steak at this point (although I do make a mean seitan), but I've made it my mission to find a good buffalo sauce.

Chefs beware! This recipe is not for the weak-of-heart. It's a true spicy Buffalo sauce (although if you want to calm things down a bit, see my Tips and Tricks).

Buffalo-style tofu
What You'll Need:
One package extra-firm tofu, chopped into 1/2" cubes

Marinade:
1 cup beer (I used an amber ale)
2 tbsp orange juice
1 tsp chili powder
3 cloves garlic, crushed
a few dashes salt and pepper

Breading mix for frying:
3 tbsp flour
2 tsp garlic powder
1/2 tsp salt
1/2 tsp pepper

Buffalo Sauce:
1/3 cup Frank's Hot Sauce
1/4 c. melted margarine (I recommend Earth Balance)
2 tbsp vinegar
1/8 tsp cayenne pepper
1/8 tsp garlic powder

What You'll Need to Do:
Press your tofu, then slice into 1/2" cubes and marinate (see below). Once the tofu has marinated (for at least one hour), drain it, and combine it in a small bowl with the breading mix to coat the tofu before frying.

In a large skillet, heat about 2 tbsp of oil (olive or vegetable) over medium heat. Cook the tofu for 4 to 6 minutes, turning until golden brown and lightly crispy on all sides. Meanwhile, prepare the buffalo sauce.

Combine buffalo sauce ingredients in a pot and stir well. Raise the heat to medium and stir occasionally until heated through. Add the fried tofu to the sauce when ready, stir, heat, and eat!

Tips and Tricks:
If you'd like to decrease the spice a bit, you can try increasing the butter, to 1/3 cup.

I would definitely recommend serving this with a vegan ranch or blue cheese dressing (I'll post a recipe soon!).

This sauce goes great with any veggie chicken. Sometimes my boyfriend will buy pre-prepared vegetarian buffalo wings, and dip into this stuff for a little extra oomph.

A note on marinating tofu:

Marinating tofu is much like marinating meat, with one important difference: tofu has no flavor before you marinate it! So if you like fried tofu in general, and don't feel like marinating it for this recipe, you can do that, and you'll still have a nice, spicy buffalo exterior. Marinating the tofu, however, will give you a really delicious bite, that's filled with flavor through and through. It's super easy, too!

The first thing you'll need to do is press your tofu. This is important so that the tofu can absorb the marinade completely and thoroughly. I'd recommend 30 minutes on each side, but you can cut it down if you don't have that much time.

Then just pour in your pre-mixed marinade ingredients, cover, and throw it in the fridge until you're ready! I like to use a tupperware, so that I can shake things up every so often and make sure it's well distributed. The longer you can marinate, the better; I marinated this tofu for about three hours, but the longer the better! You probably want to give it at least one hour, though.

Tofu ready to be marinated!

Marinating tofu

The marinade listed above is really, really simple. If you're planning on showcasing the tofu on it's own as a marinated protein, you can add in some specific spices and herbs, for example to make Asian or Italian-style tofu (pictured below). I'll try to post one of these recipes soon!
marinated "Italian" tofu


Sunday, February 3, 2013

Paprika Recipe Manager

How do you organize your recipes?

I meant to post this entry in January, for anyone who may have resolved to get their life a little more organized in 2013. This app is perfect if you're an active cook who'd like to have an easy way to keep all of your recipes in one place.

With so many ways to access recipes these days (online, in ebooks, magazines, or regular old recipe books), keeping everything organized can be a bit overwhelming.

For many years I've been searching online for recipes, or using recipes from my cookbooks, as well as those from friends and family. After I amassed many cookbooks, bookmarked dozens of recipes, and started a Word document with some of my favorites, things quickly became jumbled in my head. It was often hard to track down things I'd made, and I'd find myself needlessly searching through many different sources just to find a recipe I'd used a few months or even weeks ago.

Enter the iPad...! When I received an iPad for Christmas in 2010, I never could have imagined it would have a place in my kitchen. My kitchen was overly crowded as it was, and I worried about the device taking up valuable counter space. I had an even harder time imagining an effective program that would allow me to quickly and easily enter and access all of the information that I needed. The issue of counter space was resolved by my boyfriend last year. He thoughtfully came up with an elegant solution for using the iPad in the kitchen. It requires no counter space whatsoever, because it's a wall mount (the Wallee wall mount, to be exact). The truth is there are all kinds of elegant shelving, mounting, and display solutions for your iPad, and this app also works on your iPhone, so I'll leave that part to you.

If you're looking for a fantastic app that allows you to easily access and display your recipes, I've got a great suggestion for you: it's called Paprika.
Untitled

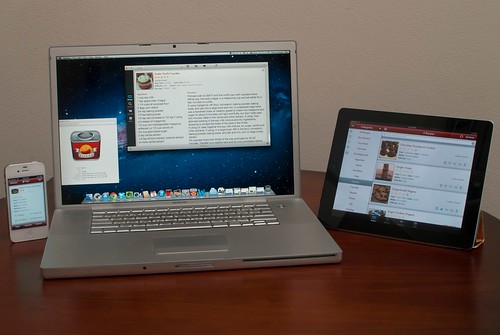
In searching for recipe management apps last year, I stumbled upon Paprika. It's a wonderful program that I highly recommend. It's available for Mac computers, iPads, and your iPhone and it can sync seamlessly across all of your devices. If you've got a collection of recipes that you'd like to have on hand at anytime, I couldn't recommend this app more highly!
It's available through the Apple App Store, it's $19.99 for the desktop version, and 4.99 for the iPad or iPhone or Android version.

Let me show you how it works...

Screen Shot 2013-01-23 at 11.27.56 AM

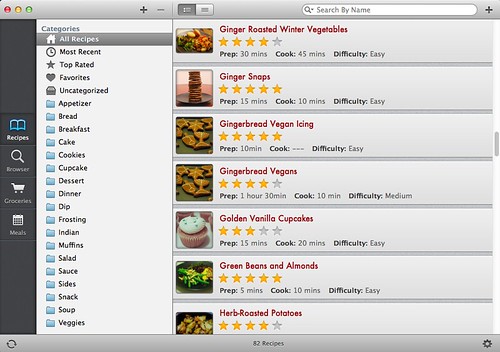
Here you can see the opening screen, which takes you to your "Recipes" screen. Notice at the top you can search recipes by name. Since I usually know exactly what recipe I'm looking for, I use this feature the most frequently. On the lefthand side of the screen, though, you can see that you can also organize recipes by category. You can create whatever categories you like (such as "Dinner", "Snacks", "Appetizers", "Cupcakes" etc.), and apply as many categories as you want to each recipe, for easy cross-referencing. You can also rate the photo with 1-5 stars, and easily add it to your "favorites" list as well.

On the far left, above, you can see four main views to select: "Recipes" (pictured above), "Browser", "Groceries" and "Meals."

Once in the recipe view, simply click to view an individual recipe. Here is a basic recipe layout:
Screen Shot 2013-01-23 at 11.27.07 AM
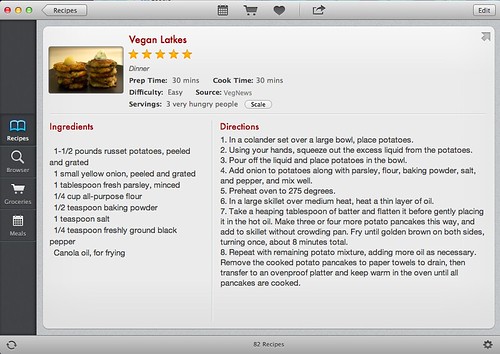
Above you can see the main categories in a "recipe card." You can add your own photo, or if you import a recipe from the web it will automatically include the associated photograph. This screen also displays the ratings and categories you have assigned to the recipe. When creating a recipe card, you are prompted to enter in the Prep Time, Cook Time, Difficulty, Source of the Recipe, Servings, Ingredients, and Directions. I like the fact that they've included the option to enter "Source." It allows me to easily access the online recipes again or double-check my sources, if needed. Perhaps one of my favorite parts about having all of your recipes organized digitally is that they're so easy to share. You can easily export any recipe, either via email or printing. That means if I have my phone with me and someone asks for a recipe, I can just send it straight to them, right then and there!

If you use the iPad app, it has built in keyboard shortcuts for ingredients, including measurements (1/8, 1/4, 1/2, etc.),  and units of measurement (tbsp, tsp, cup, etc.), and even a symbol for degrees (°). This is only necessary if you're entering a recipe manually, though, you also have the option to import a recipe using the browser feature...

The "Browser" category (pictured below) lets you import recipes directly from the web. It's an awesome feature of this application, that allows you to put an entire recipe in your collection in literally a couple of seconds.
Screen Shot 2013-01-23 at 11.28.53 AM
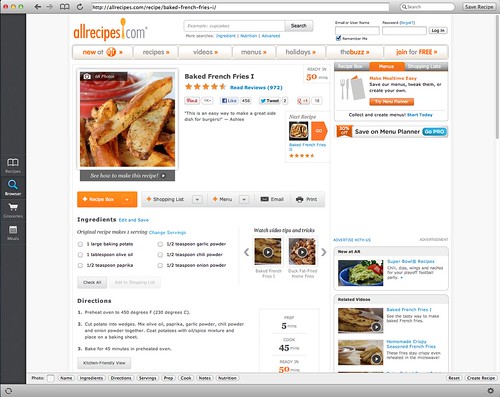
Here you can see I've searched the web, through the "Browser" feature, for baked french fries, and followed a link to a recipe on Allrecipes.com. By just clicking "Save Recipe" in the upper right hand corner of my screen, the application will instantly import all of this information into a new recipe in my library, including all of the ingredients, instructions, photo, and even preparation time and number of servings (seen below).
Screen Shot 2013-01-23 at 11.30.45 AM
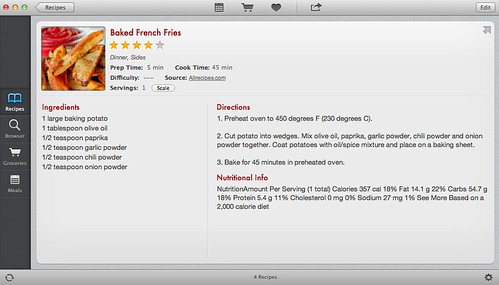
Pretty great, right? In 5 seconds time I've found my recipe and saved it in my library. If for some reason the application has trouble importing your recipe, you can always simply copy and paste whatever information you'd like into the various fields. With a click of a button, you can also submit a request to the App developers to support importation of recipes from that site.

I also recently learned about the bookmarklet feature available for Paprika. It allows you to easily import recipes to Paprika when viewing them through your normal browser. It simply adds a button to your bookmark toolbar that says "Save Recipe." You just click the button when you're on a page you'd like to save, and the next time you open Paprika, the recipe will be there!

Screen Shot 2013-01-23 at 11.35.44 AM
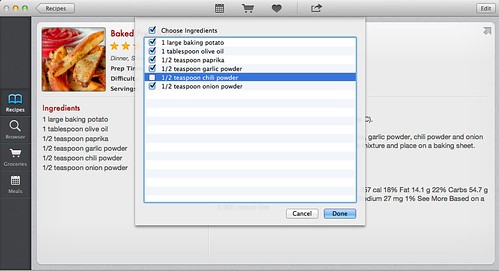
As for the "Groceries" window in the application, you can add ingredients from any recipe to your grocery list, by simply clicking the cart icon in the top of the window. The ingredients from the recipe will then be pulled up, allowing you to select or deselect any ingredients that you would like to add to your list. You can do this for as many recipes as you'd like, and of course add other items to your grocery list manually, if needed.
One of the best aspects of the grocery list is that it categorizes the items by area in the grocery store.
Screen Shot 2013-01-23 at 11.36.23 AM
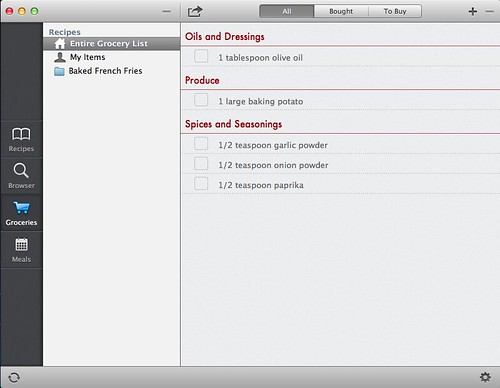
The grocery list can be emailed or printed, but if you have the application on your phone or iPad, you can easily access it in the store!
Screen Shot 2013-01-23 at 11.34.32 AM
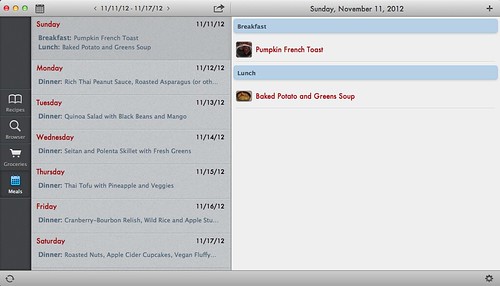
Another component of the application which you may or may not find useful, is the "Meals" feature. This allows you to enter meals into a calendar for particular days. I don't actually use this too often, but if I'm making a large meal with many different components, I find it helpful. I can then easily switch between the different recipes I'm using for that evening.

Other Notes: 
For my far-sighted readers out there: if the font looks small on the above screen shots, it is. But you can adjust font settings in the app (the font pictured above is "small" but it can be sized up to "extra-large"), so don't despair!

The app is really geared towards users cooking while using the iPad. This is the easiest way to see your entire recipe and list of ingredients on one screen (as opposed to the iPhone where you do have to click between these items, although it's relatively streamlined). Certain features on the iPad and iPhone are not available on the desktop version. I think this is limited to the "tools" feature, which pops up whenever you view a recipe on your iPad or iPhone. This feature gives you three categories: "Timers", "Converter", and "Scale Ingredients.""Timers" is just what you'd imagine; it allows you to add as many timers as you like, and you can name each one to keep track of multiple items while cooking. Converter allows you to easily convert from one measurement to another (tablespoons to teaspoons, for instance), although I find I need this infrequently, due to the "Scale Ingredients" tool. When you click "Scale Ingredients" you can scale the recipe that you are making. The program will automatically, scale the recipe to whatever quantity you select: you can 1/2 the recipe,  or multiply by any fraction or multiple up to 100.


So that's Paprika in a nutshell. It's incredibly user-friendly. Since getting it last spring, I've introduced it to some friends and family members, and everyone's loved it!

Saturday, February 2, 2013

Quick 'n' Easy Vegan Hot Cocoa

As snow dusted New York City yesterday I had a craving for one of my favorite winter treats...hot cocoa.

hotcocoa_20130201_06

Hot chocolate has always been a favorite indulgence of mine. With time...and age...my love for it has hardly waned. When I stopped having milk products I struggled with saying goodbye to hot cocoa. I soon discovered several vegan options for hot cocoa powder, but ultimately found that they lacked the richness and flavor so easy to attain in those instant hot cocoa packets of my youth! They were also quite expensive, and could be difficult to track down outside of a big city.

Luckily for me it wasn't long before I discovered Ghirardelli double hot cocoa powder. Its not the most budget-friendly version of hot cocoa, but certainly every bit as rich and delicious--if not more so--than the Swiss Miss and Carnation hot chocolate packets from the grocery store. A little does go a long way, so a splurge on one can of the mix (which goes for about seven or eight dollars) could potentially get you through the winter--just mix with your non-dairy milk of choice (although I recommend soy milk, see below*), and follow the directions as you would for the regular old cow's milk version.

If, however, you want something you can throw together with ingredients you likely already have in your kitchen, check out this easy alternative!

hotcocoa_20130201_01
Quick 'n' Easy Vegan Hot Cocoa
servings: 2
What You'll Need:
2 cups soy (or almond) milk*
3 tbsp cocoa powder
3 tbsp sugar**
1/4 tsp vanilla extract
1/4 tsp chocolate extract (optional)
Vegan whipped topping of choice or vegan marshmallows (optional)***

What You'll Need to Do:
Add soymilk to a small saucepan and heat over medium heat, stirring frequently with a small whisk (this will help you get maximum frothiness), until desired heat is reached. Once milk is heated through, add vanilla, sugar and chocolate, stirring continually until fully dissolved. Remove from heat, pour into mugs, and serve immediately!

Tips and Tricks
You may want to increase the amount of cocoa and sugar (by about 1tsp or so) if you prefer a richer flavor.

*You can use any dairy-free milk you'd like, but I find that soy milk has the thickest body, and works best for this type of drink. The next runner up is almond milk, followed by rice milk (which is much thinner and not quite as rich as the other two). The type of soy milk you buy makes a difference, too. For this recipe, I'd recommend using an "original flavor" (these are slightly sweetened, if you use an "unsweetened" milk, simply add more sugar to taste). See my "Vegan Pantry" page for more information about the different dairy-free milk options available.

I like heating my milk in the saucepan--I think it gets the best even temperature this way, and stirring the cocoa powder and sugar in while it's still very hot allows them to dissolve and be distributed evenly. You can, however, heat your milk in the microwave if you prefer, it should need just 90 seconds to heat, and you can stir in the cocoa powder and sugar immediately after removing (this would work especially well if you're just preparing one serving!).

I use soymilk with a little added vanilla, because I don't generally drink vanilla soy or almond milk. If you have either of those on hand though, just leave out the vanilla extract and save yourself a step!

**Not all sugar is strictly considered vegan, see my "Vegan Pantry" page for more information.
***see my entry on vegan marshmallows for more information, or my tips below for a discussion of vegan whipped toppings.

hotcocoa_20130201_12
Some Notes on Whipped toppings:
I used Soyatoo! Whipped topping for my hot chocolate. They make both soy and rice versions. I've never tried the rice-based topping, but I really like the soy one. This canned whipped cream is the closest approximation to the dairy version of whipped cream that I know of. However, they have changed something in their ingredients or manufacturing in recent years, and I've had a bit more trouble getting the can to dispense the last few times I've used this product. The can instructs you to leave it out to warm up for about 10 minutes, but this is not enough time--the cream is still too cold and hard to dispense. The easiest solution is to run it under hot water, shaking the can after about a minute or so to see if the cream is moving inside. Once you feel it moving, give it another few good shakes and then spray, if it still has trouble coming out you'll need to heat it up a bit more. A bit frustrating, I know, but well worth the little bit of extra effort if you ask me!

Soyatoo also makes a boxed version of the whipped cream that you can whip yourself, which apparently is quite good but a bit hard to find (although I've seen both versions available at Whole Foods). And if you're feeling extra ambitious, or don't want to use a processed product, you can always make your own vegan whipped cream (most commonly using tofu or coconut cream). This is something I've been meaning to try for years...but I haven't gotten around to it just yet.

Recipe Update (1/2014): This recipe originally called for just 2 tbsp of cocoa and sugar. This is fine if you want a more subtle, mellow cocoa but, over time, I've found I prefer 3 tbsp!