This recipe for beet & bulgur salad was featured in an article by Melissa Clark in the Restaurant Takeaway section. The recipe is from Bill Telepan of Telepan Restaurant on the Upper West Side. It immediately caught my eye, particularly because I was looking for a way to incorporate the last of my winter CSA beets into a spring-appropriate dish.
Never heard of bulgur? It's a whole-wheat with a high nutritional value, often used in Middle Eastern cooking. Beet juice is used to infuse the bulgur, making for a truly bright and beautiful salad!
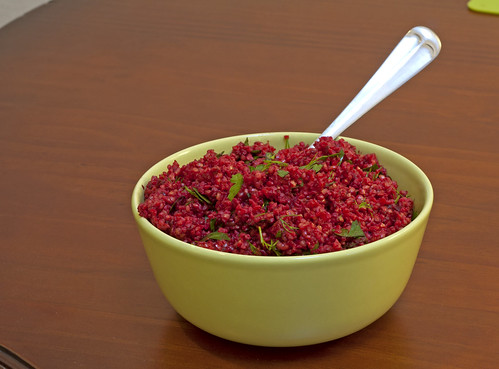

Beet & Bulgur Salad
What You'll Need:
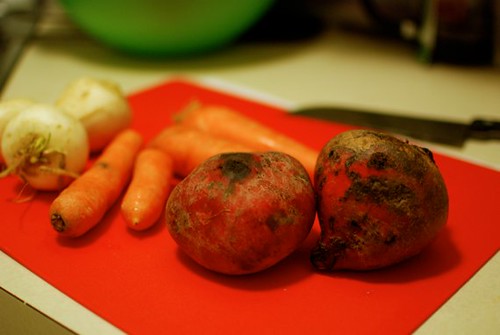
1/2 pound beets
1/3 cup plus 1 tablespoon extra-virgin olive oil
1/4 teaspoon coarse kosher salt (plus more, as needed)
Black pepper (as needed)
1 cup medium bulgur wheat*
1/4 cup red wine vinegar
1 1/2 teaspoons Dijon mustard
1/3 cup canola oil
3 tablespoons chopped dill
3 tablespoons chopped parsley
What You'll Need to Do:
Preheat the oven to 450 degrees. Place some foil under the beets and drizzle with 1 tablespoon oil, a couple of tablespoons water and a sprinkling of salt and pepper. Cover beets with foil, place in a baking pan and bake until tender when pierced with a knife (30 to 60 minutes, depending on how small or large they are). Allow the beets to cool, then peel and dice.
Place bulgur in a large bowl (or heat proof container).
Add the beets and two cups of water to a medium pot. Bring to a boil and simmer for 2 minutes. Strain the beets and reserve the liquid. Take 11/2 cups of the beet liquid and season with 1/4 teaspoon salt. Pour over the bulgur. Cover the bowl tightly with plastic wrap (or tight lid) and let sit until liquid is absorbed, about 1 hour.
Meanwhile, prepare your beet vinaigrette. In a small bowl, whisk together vinegar, mustard and a large pinch each salt and pepper. Whisk in remaining 1/3 cup olive oil and the canola oil; add more salt and pepper if needed. Add beets to a blender, and pour dressing over them. Pulse until the mixture forms a coarse purée.
Once bulgur has absorbed all of the beet liquid you had previously added (above), add half of the beet vinaigrette to the bulgur and toss well. If bulgur seems dry, add a little more dressing, to taste. Toss in parsley and dill and more salt and pepper if needed. Serve or refrigerate for up to 2 days.
My Thoughts:
This dish makes more beet vinaigrette than you'll actually need to dress the bulgur. You can add the remaining beet vinaigrette to salads or even spread a small amount as a bit of a beet relish onto a sandwich, if you're feeling adventurous.
Although I roasted the beets myself (and they were delicious!), you could buy pre-cooked beets if you are looking to save some time (just skip the first paragraph of the directions above).
I've been experimenting with lots of beet recipes this season. In the fall and winter, roasting is one of my go-tos. Before tackling this recipe, I tried a stellar recipe for beet burgers with lentils and brown rice, from the Post Punk Kitchen. My boyfriend was a bit hesitant, as he's not usually a fan of beet burgers, but he and our omnivorous dinner guest both devoured their burgers!
A final note:
*I used coarse bulgur wheat for this salad since my local supermarket did not have a "medium" grain. It worked great!